How to: Creating a Simple Request/Response OSB 12c Service
Oracle Jdeveloper Studio 12c has enabled the development and
deployment of OSB services to become much simpler and more streamlined.Taking guidance from SOA composite development,
OSB services can now be developed using a drag and drop technique, thereby making
the whole process of developing much more efficient over the previous versions
that used wizards and configuration forms. I am going to break down the necessary steps needed to create a simple request/response service that will call a SOA web service composite.
Anyone who has done any SOA development using Jdeveloper, will find the new layout familiar, a resource pane to the left, component pane to the right, with your main development window centrally.
Anyone who has done any SOA development using Jdeveloper, will find the new layout familiar, a resource pane to the left, component pane to the right, with your main development window centrally.

Enabling developers to develop this way makes for a much
quicker and simpler task, especially with the ability to see the Proxy
Services, pipelines and Business Services all in one window. The above image shows a complete OSB 12c Service, of which I am now going to show you how to
complete. I am going to be completing this tutorial using my own XML artefacts
of which I have already completed, therefore you will have to have some to hand
for your own examples.
To begin with, open up Jdeveloper Studio 12c. Proceed
to click File followed by New. Scroll down the list to find Service Bus Tier,
and then select Service Bus Application.


Complete the next window in the wizard with a useful
application name and then press Finish. This will give us our holder for all of
our OSB Projects.
Note: You cannot create an OSB interface anywhere other than
a Service Bus Tier application.
Once the application has been created, continue by
creating a new project. Begin in the same way as creating the application, however
this time we are going to choose Service Bus Project instead of application. Continue through the wizard as before which will result in a project being created making sure that the project is being created in the correct OSB Application.


From this point we can begin to build up all of the
resources that we need to build ourselves a working OSB interface. In the most
simple terms, a Proxy Service, Pipeline, and Business Service. The Proxy
service is the interface that communicates with the Service consumers,
receiving a message of a specified transfer protocol (HTTP/S, FTP etc.) and
sending that message onwards using the same or another protocol; subsequently to
be sent to the Business Service through the configured Pipeline. The Pipeline is
where we can define the routing and any actions to be taken on the message
whilst in transit to the Business service, and finally, the Business service is
the interface that connects with the service producer which will be defined
using a WSDL or WADL and specified type of transport. We are going to begin our
OSB service with the Business Service.


Once the wizard opens, give your Business Service a
meaningful name, select the transport as HTTP and click Next. The next page in
the wizard will be an important page, as this is where we will be basing our
business service on the WSDL of the SOA component that we are going to be
calling. Select the specified WSDL from the file expolrer and then complete the Business Service wizard by clicking Finish.
NOTE: If your WSDL doesn't include a binding, you can simply
add one by opening up the WSDL in design view, clicking the little green plus
symbol on the top of the binding section and adding the correct binding to your
WSDL operation.
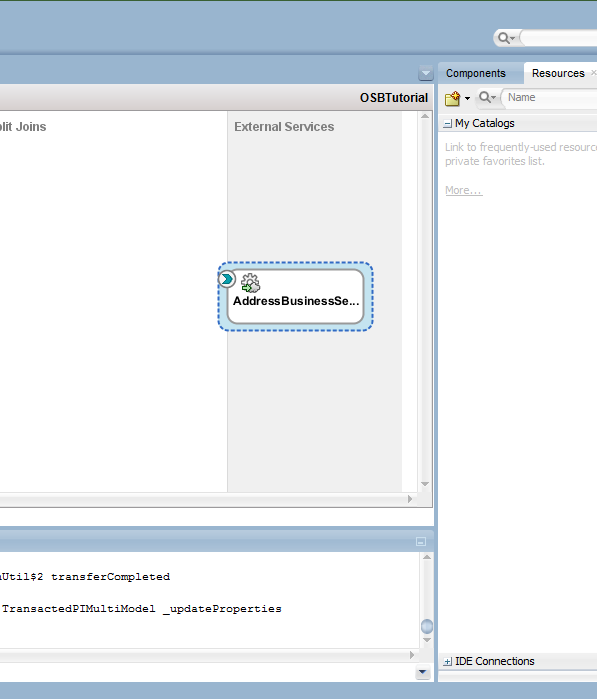
After completion, there will be a Business Service in the External Services swim lane.
Now that we have our Business Service complete, we can
continue to build the rest of the service. For the next part, we are able to complete the rest of the OSB service off in one motion.
We are going to begin by adding a pipeline into the
Pipelines/Split Joins panel of the window, again, by either right clicking and
adding a pipeline, or dragging one in from the component panel. From the
opening wizard window, chose a suitable name for the pipeline and click next.
The next window is where we need to be careful. We need to choose a WSDL for
the interface as well as the binding, and then we must click the expose as a
proxy service check box further down the window. This exposes the pipeline to the
service consumers via a HTTP enabled Proxy service, which is what we need for
our simple service.

This is not the only way to create the exposed Proxy
service, but I find that it is the most straightforward.
At this stage, we are very close to being complete in our simple service. All that remains for us to do, is connect the pipeline with the Business service and then complete our pipeline.
At this stage, we are very close to being complete in our simple service. All that remains for us to do, is connect the pipeline with the Business service and then complete our pipeline.
Connecting to the pipeline is simple. Dragging the arrow
from the pipeline, to the arrow on the Business service creates our connection
and also completes part of our pipeline development for us as well.


From the following window, you can see that the routing to
the Business service has already been completed by just creating the drag and
drop connection in the previous step. This saves us a lot of fiddling for a
simple service like this, however if we have a more complex service that may include
multiple business services and multiple operations on the Proxy service then we
have to be careful that we are connecting it up correctly. So double check this
routing connection every time to be sure.
As we are just passing information through at this stage, we do not explicitly have to do anything in the pipeline, although adding in a log component to record the incoming/outgoing message can be useful. Usually, if we had to perform some form of transformation, this is where we would carry that out using an assign or replace component or alternatively an XSLT transformation or XQuery expression.

As we are just passing information through at this stage, we do not explicitly have to do anything in the pipeline, although adding in a log component to record the incoming/outgoing message can be useful. Usually, if we had to perform some form of transformation, this is where we would carry that out using an assign or replace component or alternatively an XSLT transformation or XQuery expression.

And there we have a complete, albeit simple OSB service build in Jdeveloper Studio 12c, using HTTP as a transport and connecting to a SOA web service. There
are many extra features that can be done to this service, including adding
security policies, more complex pipeline processes and multiple operations, but for the sake of this tutorial, I didn't want to cover
those. The next step is to deploy to your server and test, and you’re all done
with your OSB service.