Among the many features provided by Oracle SOA Suite, I believe asynchronous message handling is one of the most powerful and important capabilities on offer. It enables us to have long running transactions via the dehydration store, rich error handling via the error hospital and callbacks via WS-Addressing among others.
Unfortunately, while this capability is very powerful, I find it is rarely fully understood, especially when considering performance and transactionality. Furthermore, understanding what happens 'under the hood' can help us to design better, more performant and resilient BPEL processes.
In this blog I will detail how the delivery policy plays a pivotal role in asychronous message exchanges and how it can impact the design of SOA services and integrations. I will use a simple example of using a number of composites to integrate two databases, but the detail of each composite is not important.
Asynchronous One Way via the Delivery Service
The diagram above illustates how threads and transactions are managed in the default configuration. By default, SOA Suite inserts all new messages (whether from JCA adapters or web services) into the delivery service before they are processed by BPEL to ensure there is no message loss, even on a server failure. As messages become available in the delivery service, a set of threads known as invoker threads pick these messages from the service and deliver them to the BPEL engine for further processing. In addition, each BPEL process instance and subsequent insert back into the delivery service is performed in separate transactions.
This approach has the following advantages:
1. No message loss, even if the server were to fail mid-process - the message is stored in the delivery service ready to be processed when the server becomes available again. Assuming that the BPEL process interacts with external data sources in an XA transaction, no commit will have taken place prior to the failure and therefore the message can be re-processed. Note however, that special care must be taken when working with non XA resources such as external web services. These services will commit within their own transaction, and re-processing a message can lead to duplicate data or primary key violations.
2. Scalability. Placing a message in the delivery service allows messages to be processed when a thread becomes available as opposed to executing immediately in the thread that created the composite instance. This has the advantage of allowing for fine grained thread control. For example, one could restrict or increase the number of invoker threads available on the server to control the throughput of asynchronous transactions - messages can remain queued in the delivery service until a pooled invoker thread becomes available.
However, there are also some disadvantages:
1. Inserting into the delivery service provides no guarantee on when the message will be picked up and processed. With sufficient server load and many running instances, it may be a number of seconds before an invoker thread is available. This has obvious implications for low latency applications - a message may not arrive at its destination in the timeframe set out by an SLA.
2. Inserting into the delivery service requires additional database persistence; this is because before a message can be processed by the BPEL engine, it must first be stored in the dlv_message table. Of course, this approach also has an advantage (no message loss) as described above.
3. 'Context switching' between pooled invoker threads happens more frequently because the thread responsible for inserting a message into the delivery service may not be responsible for processing it.
4. As a message traverses through a number of composites as part of an integration, these composites may contain an arbitrary number of activities such as interacting with file systems, web services and databases etc. As each composite completes, a commit will take place. This may be adequate for some software systems, but for systems which require an atomic transaction across the entire integration, this can lead to data inconsistencies if a server were to fail or an error causes a process to go to manual intervention.
Asynchronous One Way with In-memory Delivery Service
To reduce the level of persistence and increase overall message throughput, it is possible to place a message into an in-memory queue as opposed to a database table before it is delivered to a BPEL process. However, while this configuration provides increased performance, messages can be lost if the SOA server were to fail mid-transaction. In addition, work performed by each composite is committed independently (i.e. non-atomic), again resulting in data inconsitencies should the server fail.
Given these disadvantages, this is not a recommended approach.
Asynchronous One Way with no Delivery Service
An alternative configuration is to remove the delivery service and force the integration to execute as it would in a synchronous scenario - where a single thread is used throughout, with each composite inheriting the thread and using it to process the message. From a transaction point of view, a new transaction is created at each composite enty point, any existing transaction is suspended until the child transaction has completed.
The primary advantages of this approach are that the delivery service persistence is reduced and the number of thread context switches is minimised, both leading to a higher transaction throughput in a number of use cases. If your application interacts with low latency resources such as databases, JMS or Advanced Queues, then this can be a very useful configuration.
The disadvantage however, is that managing these separate transactions becomes more complex and requires careful design. For example, if a child composite encounters a fault, you have a choice to handle the fault within the child or let the fault bubble up to the parent composite (which would not be possible using the delivery service). If the fault is handled in the child composite, a commit will take place as normal and execution continues. If it is not handled, the child composite will roll back and a FabricInvocationException will be returned to the parent composite. The parent then has the choice to handle the fault locally or bubble it up to another parent composite if it exists.
In addition, a further issue can arise if your application interacts with other, high latency services. When you set the delivery policy to synchronous, you are effectively coupling any polling thread to the processing of a message, which can lead to lower throughput if the thread is blocking waiting for a reply from another service.
In summary, removing the delivery service can have a profound impact on throughput and may be the configuration of choice for high volume environments. However, a designer must understand the finer details of a process to ensure that transactions and fault conditions are handled appropriately. In addition, one must also understand the impact of using a polling thread to process a message, as opposed to delegating it to an invoker thread (i.e. using the delivery service).
Asynchronous One Way (No Delivery Service, Inherit Transaction)
A slight variation on the approach above is to continue without a delivery service, but ensure that the entire integration is performed in a single transaction. This approach maintains all of the performance advantages, but can also make the design simpler because transactions do not have to be managed locally in each composite.
For example, should a fault occur in a child composite, the handling of this fault will directly impact the transaction state of all composites within the flow. If the fault is handled, all XA resources in each composite will commit - if it is not handled, then all resources will rollback.
I should point out however, that in our example of a polling database
adapter as the message source, if a fault occurs, the message will be
propogated back up to the adapter if it is not handled in any of the
composites. The side effect of this is that by default, the database
adapter will attempt to retry the transaction many times, leading to the
creation of additional instances until the transaction succeeds.
One may conclude that this must be the best approach, and in many use cases it is, mainly because of the single, atomic transaction. However, there are a number of other scenarios which require the transaction to be split between composites. A simple example would be that of logging - if we have a requirement to persist log messages to a database table, we would want those messages to commit regardless of the state of the business transaction. We could achieve this by using a separate logging composite, with the transaction parameter set to 'requiresNew'.
In summary, there is no definitive configuration that will suit all integrations styles. One must first understand all of the application requirements and SLA's before the most appropriate configuration is chosen.
A Blog on all things to do with integrating systems using Oracle tools and Middleware
Wednesday, 6 January 2016
Monday, 4 January 2016
Deploying a Composite to SOA Cloud Service
Deploying a SOA composite to Oracle SOA Suite Cloud Service
You will have no doubt deployed to local or on-premise SOA Suite servers countless times (unless you are brand new to SOA) but deploying to the cloud is slightly more complex. The current version of SOA Cloud Service (CS) only allows us to deploy composites using a SAR file through the Fusion Middeware (FMW) Control console and not directly from JDeveloper 12c. This blog entry describes how to deploy composites to the Oracle SOA Cloud Service.
Firstly, identify the SOA composite to be deployed in JDeveloper and then right click and deploy this into a SAR file (see below):
Follow the wizard and ensure that the deployment process has completed successfully. Copy the URL provided in JDeveloper to the clipboard as we will require this later in the process.
Once deployment has completed, we need to open our Cloud Service Fusion Middleware Control console. To do this, access the My Services Oracle Portal and select the SOA Cloud Service Console. From here select the SOA instance that you would like to deploy to. Click the four little lines on the right hand side of that instance and once the menu opens, select the Fusion Middleware control console as illustrated below:
Log into the console using the required credentials. The first thing that you will notice is that the layout looks very similar to the Enterprise Manager (EM) console used in previous versions of SOA Suite (11g and 12c ). Once into the EM console, we can deploy our composite in the same way that we have done previously using on premise installations. So, open the required SOA infrastructure instance using the tree on the left hand pane and then select the partition to which you wish to deploy.
Then open the Deployed Composites tab on the right hand pane, and click deploy to this partition.
From here, select "Deploy from Archive" option and paste in the file location that we copied earlier on in the process.
Click Next and then select Deploy which will initiate the deployment process. Should the composite deploy successfully, you will get a success pop up window as follows:
And there you have it! Now all that's left is for us to do is to test the composite, which can be done either from the EM console itself or using an external program such as SOAP UI.
NOTE: This deployment technique is the same for OSB services as well.
Friday, 18 December 2015
Setting up an Oracle Cloud Service (Trial Version)
Oracle is currently offering a 30 day free
trial on their SOA Cloud service, which is a very good way of introducing
yourself to the joys of PaaS. I would suggest giving it a whirl, if only to
understand just how Oracle is positioning its cloud based offerings. This blog
describes the required steps to provision a trial version of the Oracle SOA
Cloud service, which whilst relatively easy to do, does have some gotcha’s that
you should be aware of!
Oracle SOA cloud provides access to 12.1.3
of SOA Suite in a fully managed environment. By subscribing to a managed cloud
environment, developers get rapid access to SOA Suite without the need to wait
for lengthy environment provisioning by the I.T department, as was
traditionally the case. This means of course, that you can start developing
innovative applications far more quickly, without worrying about all the
nuances associated with a complete produce install! Please note however, that
Oracle currently does not have a fully ported version of SOA on the cloud: B2B,
Managed File Transfer, Enterprise Scheduling, Event Processing, and BAM are not
currently available.
Oracle offers two models of subscription
for its SOA Cloud Service: A non-metered version (there are several pricing and
service levels to suit the needs and budget of your organization) or a metered version. The latter
can be ordered via a purchase order or by pre-paid subscription or pay as you
go.
It is worth mentioning that before you can create a SOA Cloud instance, you need to subscribe to Oracle Database Cloud Service
(the full one and not Database Schema!) and also to Oracle Storage Cloud - the
latter is used for database backups.
So how to start…..
First off subscribe to the Oracle Public
Cloud Service:
As part of the subscribing process, you will need to request a verification
code (see the "Request Code" button in the above screen shot). This is sent as a SMS message to your mobile. You need to enter the code sent prior to selecting the “sign up” button.
Once your subscription has been accepted, Oracle will send you an email
detailing how you can access the various consoles required to complete the
installation.
Setting up access to Cloud Storage....
Firstly, you must subscribe to the
Cloud Storage. This is not quite as easy as it might seem as you need to access
this service via a REST API (you can also access through an official java library). Oracle
recommend that you use a tool called Curl to do this. Installing Curl is
straight forward enough. Details of how to do this can be found at the following URL: http://www.oracle.com/webfolder/technetwork/tutorials/obe/cloud/objectstorage/creating_containers_REST_API/files/installing_curl_command_line_tool_on_windows.html
Oracle Storage Cloud Service
requires authentication for any operation against the service instance.
Authentication is performed by using an authentication token, which
expires every 30 minutes. You must include your current authentication token
with every request to Oracle Storage Cloud Service. To request an
authentication token, run the following command (substituting your details for
the tokens below):
curl -k -v -s -X GET -H "X-Storage-User:
Storage-<<your domain>>>:<<your email>>>" -H
"X-Storage-Pass: <<your password>>" https://<<your domain>>.storage.oraclecloud.com/auth/v1.0
NOTE: You must first have logged onto the MyServices console to set a replication policy for the Cloud Storage instance – do this by
logging on and selecting “Set Replication Policy”. Otherwise, you cannot access the Cloud Storage instance (so beware!).
Executing this command will give you an authentication
code that you can use to create a container. The container is created using the
following command:
curl -k -v -s -X PUT -H
"X-Auth-Token: AUTH_tkb7364f9f8b937c96c8e2a8e716 914092" https://storage.us2.oraclecloud.com/v1/Storage-<<your
domain>> /myFirstContainer
NOTE: Clearly, you will use the security token generated using the above step. I have included a token as an example only here.
To verify that this is set up
correctly, issue the following command:
curl -k -v -s -X GET -H
"X-Auth-Token: AUTH_tkb7364f9f8b937c96c8e2a8e716914092" https://storage.us2.oraclecloud.com/v1/Storage-<<your
domain>>/myFirstContainer
You will use the above storage container when defining your DBaaS instance (see below).
Generating a SSH Key Pair…..
When you define your Oracle DBaaS
database instance (see below), you will need to provide a secure shell (SSH) public key to
establish secure connections. I used the
PUTTY Key Generator on windows to do this. This is fairly straight forward and
there are plenty of details on the web, so I will not go into details here.
Creating a Database Instance…..
Oracle SOA Cloud Service employs the Oracle
Database Cloud Service to host the Oracle Fusion Middleware component schemas that are required by the Oracle Java Required Files (JRF).
So before we can get access to SOA Cloud we must create a
database service instance. You will do this from the My Services console. From the console, select the Oracle Database Cloud Service and go to the Dashboard view. Then select the “Create Instance” button (see below):
This will invoke the Create Database
Cloud wizard. Here you will select your subscription type (I chose Oracle
Database Cloud Service) and your desired billing frequency. Also, the database version
and edition.
Next you will be asked to configure
the database instance. Here, you will need to specify your cloud storage container and upload
the public key that was generated in the above step:
Once you have entered your details, hit “Next” and you will be presented with a summary for your requested Database Cloud instance. You can create the instance and await email confirmation. This
takes about an hour! Amazing really! Remember the joys of having to commission a new server to hold your database, get "operations" to install the database and patch it and then agree a back up schedule!!! No more need for all this time consuming bureaucracy!!
Finally, you need to create your SOA
Cloud instance once the database is created.
Creating a SOA Cloud Service
To create the SOA Cloud instance, go to the
dash board and select the SOA Cloud icon. This will take you to the SOA Cloud
Service Console (see below). From here you will select the “Create Instance” button and
this will invoke the SOA instance creation wizard.
From here, click ‘Create Instance’. Next, you will
select the type of weblogic domain that you want to be configured and the
billing frequency. I choose a SOA and OSB cluster:
Next, you are presented with a
summary of the software selected. Just hit “Next” to continue once you are happy. This will take you to the main
configuration page for your weblogic domain. Here, you need to specify the
instance name, provide details of your cloud storage and database instance and
create a weblogic administrator user and password as shown below:
NOTE: The public key is the
same used for the DbaaS creation above. Also, the database admin user should be set
to sys and the schema password entered as per the Database cloud service
creation.
Finally, you will be presented with a summary
of the SOA Cloud instance that will be created:
And, that’s it. Now just click Create and
someone will do all the heavy lifting for you! Amazing!
Validating
the New SOA Cloud Instance…..
Once the instance is created (after approx. 1 hour)
you will have access to the service instance from the SOA Cloud Service Console
as shown below:
And there you go! As simple as that! The
only thing that remains to do is to open up the weblogic console and validate access.
Enjoy!!!
Wednesday, 16 December 2015
Oracle Integration Cloud Service
Many companies today are looking to remove costs from the bottom line by moving non-mission critical applications
into the cloud. There are many advantages to doing this but the main being to
lower the TCO (total cost of ownership). However, there still remains the
problem of integrating these applications with other enterprise applications and with on premise systems. These new SaaS applications
cannot function in splendid isolation!
I have spent some time recently
investigating Oracle’s Cloud Integration Service (ICS). ICS is designed to
simplify the task of integrating data between SaaS applications. It can also be
used for SaaS to on premise integration using either Rest or Web service calls
(currently).
Oracle has done a good job of abstracting
the complexity of connecting to SaaS applications by introducing Application
Connectors: all the user needs to do is to configure the endpoint and provide
credentials. Once connected, the user can use the web based mapping tool to map
data between the applications.
Oracle has been keen to boost the community
aspects of the tool by providing recommended mappings based on what most users currently use. This can make the job of mapping much simpler and open
up the possibility that integrations can be done by functional rather than
technical experts. Nevertheless, Oracle also provides more advanced mapping
functions where straight forward field mapping is not obvious or achievable.
Oracle is really pushing this area and they
are providing many pre built application connectors to SaaS applications such
as its own SaaS offerings (e.g Service Cloud) but also third parties such as SAP,
Netsuite and Linkedin. The pace of development is very rapid in this area and
new connectors are being provided almost monthly by Oracle. There are somewhere
in the region of 2500 SaaS applications available in the market today and
Oracle cannot possibly hope to provide connectors for all of them. So, Oracle
are supporting third party developers to create their own Application
Connectors using the shipped SDK. Since
ICS is based on the tried and tested Oracle Service Bus for its implementation,
the same application connectors can be used on premise or in the cloud. Perfect
for saving time and effort!
Security protocols are supported too. Web
Service calls can be secured with basic authentication, WS-Security
username/token, or other mechanisms, along with transport level security using
SSL/TLS. Future releases will support the uploading of certificates.
Integration Cloud Service runs on Oracle’s secure cloud infrastructure with
each tenant getting their own dedicated environment.
The beauty of ICS lies in the fact that
integration between SaaS applications can be packaged up and sold (or even
given away!) on the Oracle Marketplace. This will help companies moving to the
cloud to rapidly set up integrations that previously would have taken weeks or
months via the more traditional software development lifecycles.
Oracle has made several announcements
regarding the roadmap for ICS and they are quite exciting! These include the
introduction of basic orchestration features in future versions to allow for
enrichment of data prior to mapping. Also, to help with security issues, Oracle
will provide agents that will execute on premise and talk back to ICS. These
agents communicate via Rest so there is no need for complex firewall rules.
Oracle offers four main approaches to
integration with ICS:
Cloud adapters, Technical adapters (for
database, FTP, SOAP connections), on premise agents (to be introduced shortly)
and finally the SDK/market place.
Further adapters will become available over
the next few months to open ICS up to SFTP, databases and many other back-end
systems.
Most importantly, Oracle also provides rich
web based monitoring tools to provide visibility onto the performance and
reliability of the integrations.
So one question I had was where does SOA
Suite fit in now that more orchestration features are being built into ICS? I
think that the answer lies in what you are trying to integrate. In much the
same way as Oracle Service Bus can be used to provide orchestration (of sorts
using pipelines), I would never recommend doing this. SOA Suite has many
features that make this more suitable such as dehydration. In the same way,
just because ICS can do something, doesn’t mean that it should be used if it is
not best tool for the job. So, in summary, for more complex integrations,
especially long running processes, SOA Suite is still the best choice – whether
on premise or in the cloud. ICS however, is an excellent tool that provides an
elevated user experience (meaning that it can be used by non-core techies) for
SaaS to Saas and SaaS to on premise integrations.
Finally, I would not recommend using the
tool for batch integrations either, as there are better alternatives, such as
Oracle Data Integrator (ODI).
How To: Enable WSS UsernameToken Profile in SOA Suite 12c
The Enable TLS on Weblogic 12c blog gave a simple set of steps to enable private and confidential communications between a client and Weblogic server. However, while TLS (server authentication) does provide an encrypted channel between the client and server, it does not provide access control to services that may be deployed and running.
As a solution to this problem, this blog will detail how access control can be enabled for an SCA composite web service deployed on SOA Suite 12c. We will be using the WSS UsernameToken Profile policy available in Oracle Web Services Manager (OWSM), and in addition, we will also see how a secured web service can be tested in soapUI.
NOTE: It is of paramount importance that the UsernameToken Profile is used over an encrypted channel such as TLS. The reason for this is that the username and password (or digest) are sent in plaintext and are susceptible to man-in-the-middle attacks.
Attaching the UsernameToken Profile Policy
Attaching OWSM policies is a simple activity, performed in the Enterprise Manager Fusion Middleware Control application. The following steps detail how a policy is attached to (an obligatory) Hello World web service.
1. Log into the Enterprise Manager at http://{host}:{port}/em and navigate to the SCA composite home page
2. In the 'Service and References' section, click on the exposed web service link to go to the service dashboard
3. In the web service dashboard, click the 'Policies' tab
4. In the 'Directly Attached Policies' section, click the 'Attach/Detach' button
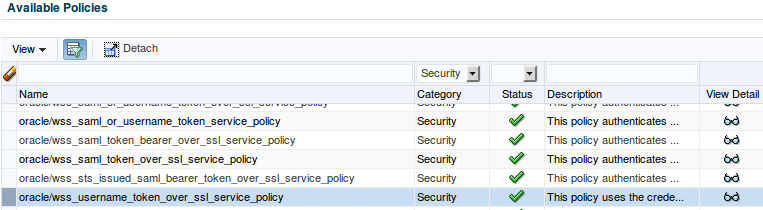
5. In the 'Available Policies' section, select the oracle/wss_username_token_over_ssl_service_policy, click 'Attach' and 'OK'
Testing a Secured Web Service in soapUI
To confirm that the policy configuration above has been applied successfully, we can use a testing tool such as soapUI. SoapUI is a testing suite capable of running tests against SOAP or REST endpoints, it has been around a good number of years now and has become a crucial tool in the utility belt of both web service developers and system testers alike.
Verifying the Policy Attachment
To verify the policy attachment, we only need to load the SOAP project in soapUI and send a test message. If the policy has been applied correctly, then a HTTP 500 Internal Server Error and invalid security message should be received as we have not provided any credentials yet:
Adding the UsernameToken
To call the web service successfully, we need to add a UsernameToken to the SOAP header. This can be done as follows:
1. In the 'Request Properties' box of soapUI, enter the username and password for the service
2. Right click in the request window and select 'Add WSS Username Token'
3. Right click in the request window again, and select 'Add WS-Timestamp'
Re-send the message. This time the response should contain a HTTP 200 and the SOAP response:
This completes the UsernameToken Profile configuration and testing. Hopefully you can see just how simple OWSM makes security configuration.
As a solution to this problem, this blog will detail how access control can be enabled for an SCA composite web service deployed on SOA Suite 12c. We will be using the WSS UsernameToken Profile policy available in Oracle Web Services Manager (OWSM), and in addition, we will also see how a secured web service can be tested in soapUI.
NOTE: It is of paramount importance that the UsernameToken Profile is used over an encrypted channel such as TLS. The reason for this is that the username and password (or digest) are sent in plaintext and are susceptible to man-in-the-middle attacks.
Attaching the UsernameToken Profile Policy
Attaching OWSM policies is a simple activity, performed in the Enterprise Manager Fusion Middleware Control application. The following steps detail how a policy is attached to (an obligatory) Hello World web service.
1. Log into the Enterprise Manager at http://{host}:{port}/em and navigate to the SCA composite home page
2. In the 'Service and References' section, click on the exposed web service link to go to the service dashboard
3. In the web service dashboard, click the 'Policies' tab
4. In the 'Directly Attached Policies' section, click the 'Attach/Detach' button
5. In the 'Available Policies' section, select the oracle/wss_username_token_over_ssl_service_policy, click 'Attach' and 'OK'
Testing a Secured Web Service in soapUI
To confirm that the policy configuration above has been applied successfully, we can use a testing tool such as soapUI. SoapUI is a testing suite capable of running tests against SOAP or REST endpoints, it has been around a good number of years now and has become a crucial tool in the utility belt of both web service developers and system testers alike.
Verifying the Policy Attachment
To verify the policy attachment, we only need to load the SOAP project in soapUI and send a test message. If the policy has been applied correctly, then a HTTP 500 Internal Server Error and invalid security message should be received as we have not provided any credentials yet:
Adding the UsernameToken
To call the web service successfully, we need to add a UsernameToken to the SOAP header. This can be done as follows:
1. In the 'Request Properties' box of soapUI, enter the username and password for the service
2. Right click in the request window and select 'Add WSS Username Token'
3. Right click in the request window again, and select 'Add WS-Timestamp'
Re-send the message. This time the response should contain a HTTP 200 and the SOAP response:
This completes the UsernameToken Profile configuration and testing. Hopefully you can see just how simple OWSM makes security configuration.
Tuesday, 15 December 2015
How To: Enable TLS on Weblogic 12c
Transport Layer Security is one of the most important data security protocols in use today and many organisations, including banks and e-commerce sites use it to provide private and confidential communications. Thankfully, enabling TLS (server authentication) on Weblogic is a relatively straight-forward process, requiring only a security certificate and minimal server configuration.
Generating a Public-Private Key Pair (and X.509 Certificate)
Before we can enable TLS in Weblogic, we require a security certificate that includes our public key and domain information. This certificate will be sent to a client by the server so it can verify that the server is legitimate.
One option is to acquire a certificate from an established Certificate Authority (CA) such as Thawte or Symantec (formerly Verisign). While this is the recommended approach for production, public facing systems, it can be expensive for academic and internal applications. Given that this is an academic blog, we can use another option which is to 'self-sign' our own certificate, free of charge.
To generate our own, self-signed certificate, we use can use the keytool utility that comes with the Java Development Kit (JDK) and the following command:
keytool -genkeypair -keyalg RSA -alias mydomain -keystore identitystore.jks -storepass password -validity 365 -keysize 2048
Configuring a Keystore in Weblogic and Enabling TLS
The next step is to configure the keystore created above (which contains the certificate) in Weblogic.
In summary, the steps required are:
A. Add the keystore created above to the Weblogic configuration
B. Provide credentials to Weblogic for the keystore and private key
C. Enable the SSL listen port
D. Modify the server start-up parameters to enforce the TLSv1 protocol (due to the POODLE attack in 2014, SSLv3 is no longer recommended)
In detail, the steps required are:
1. Log in to the Weblogic console at http://{host}:{port}/console
2. Navigate to the server 'Keystores' configuration screen and click the 'Change' button
3. Choose 'Custom Identity and Java Standard Trust' and click 'Save'
4. Provide the custom identity store location, keystore type, passphrase and click 'Save'
5. Navigate to the server 'SSL' configuration screen and provide the private key alias, passphrase and click 'Save'
6. Navigate to the server general configuration screen, enable the SSL listen port and click 'Save'
7. Navigate to the 'Server Start' configuration screen, add the following argument and click 'Save'. This argument could also be provided in a server startup script such as setDomainEnv.sh.
8. Restart the server for the new protocol version to take effect.
This completes the TLS setup.
Verifying the Configuration
To confirm that the configuration has been applied correctly, open a web browser and navigate to the Weblogic console on the SSL listen port (7002 in the example above). If your browser is configured appropriately and the Weblogic configuration is correct, then a warning should be displayed indicating that the server cannot be verified. This is an expected result, confirming that the Weblogic configuration is correct.
Generating a Public-Private Key Pair (and X.509 Certificate)
Before we can enable TLS in Weblogic, we require a security certificate that includes our public key and domain information. This certificate will be sent to a client by the server so it can verify that the server is legitimate.
One option is to acquire a certificate from an established Certificate Authority (CA) such as Thawte or Symantec (formerly Verisign). While this is the recommended approach for production, public facing systems, it can be expensive for academic and internal applications. Given that this is an academic blog, we can use another option which is to 'self-sign' our own certificate, free of charge.
To generate our own, self-signed certificate, we use can use the keytool utility that comes with the Java Development Kit (JDK) and the following command:
keytool -genkeypair -keyalg RSA -alias mydomain -keystore identitystore.jks -storepass password -validity 365 -keysize 2048
Configuring a Keystore in Weblogic and Enabling TLS
The next step is to configure the keystore created above (which contains the certificate) in Weblogic.
In summary, the steps required are:
A. Add the keystore created above to the Weblogic configuration
B. Provide credentials to Weblogic for the keystore and private key
C. Enable the SSL listen port
D. Modify the server start-up parameters to enforce the TLSv1 protocol (due to the POODLE attack in 2014, SSLv3 is no longer recommended)
In detail, the steps required are:
1. Log in to the Weblogic console at http://{host}:{port}/console
2. Navigate to the server 'Keystores' configuration screen and click the 'Change' button
3. Choose 'Custom Identity and Java Standard Trust' and click 'Save'
4. Provide the custom identity store location, keystore type, passphrase and click 'Save'
5. Navigate to the server 'SSL' configuration screen and provide the private key alias, passphrase and click 'Save'
7. Navigate to the 'Server Start' configuration screen, add the following argument and click 'Save'. This argument could also be provided in a server startup script such as setDomainEnv.sh.
8. Restart the server for the new protocol version to take effect.
This completes the TLS setup.
Verifying the Configuration
To confirm that the configuration has been applied correctly, open a web browser and navigate to the Weblogic console on the SSL listen port (7002 in the example above). If your browser is configured appropriately and the Weblogic configuration is correct, then a warning should be displayed indicating that the server cannot be verified. This is an expected result, confirming that the Weblogic configuration is correct.
Subscribe to:
Posts (Atom)